
If you love juicy chicken with a shatteringly crisp skin, this recipe is for you. These crispy keto chicken thighs come together with pantry spices, a hot pan, and a quick oven finish. No breading, no complicated steps—just great technique that delivers big flavor.
Whether you’re cooking for meal prep or a weeknight dinner, these thighs stay tender and satisfying. They pair with almost any side and reheat like a dream.

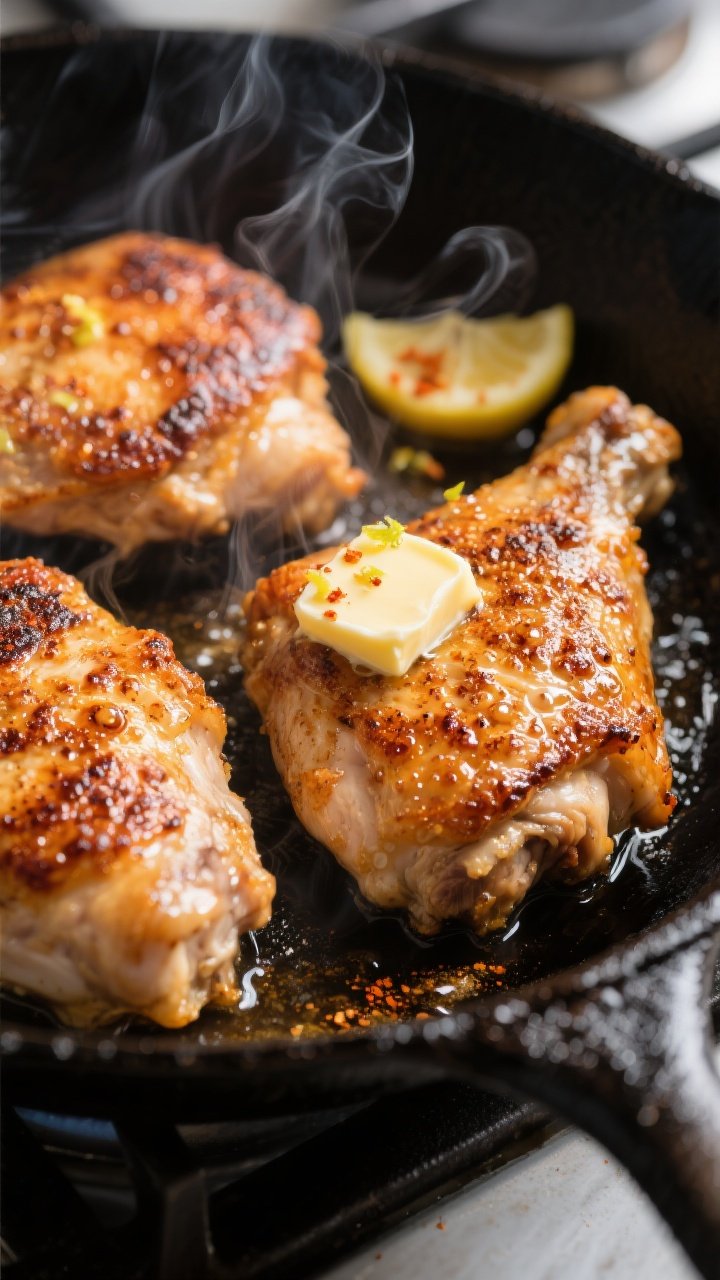
Crispy Keto Chicken Thighs - Simple, Flavorful, and Perfectly Golden
Ingredients
- Bone-in, skin-on chicken thighs (6 pieces, about 2 to 2.5 pounds)
- Avocado oil or light olive oil (2 tablespoons)
- Salt (preferably kosher)
- Freshly ground black pepper
- Garlic powder
- Smoked paprika (or sweet paprika)
- Onion powder
- Dried thyme or dried oregano
- Lemon (for zest and wedges, optional but great)
- Butter (1 tablespoon, optional for basting)
- Fresh parsley or chives (optional garnish)
- Cooking spray (for the rack, optional)
Instructions
- Preheat the oven: Set to 425°F (220°C). Place a wire rack on a sheet pan and lightly spray it to prevent sticking. The rack helps keep the skin crisp all around.
- Pat dry: Blot the chicken thighs very dry with paper towels. This is key. Damp skin won’t crisp.
- Season: In a small bowl, mix 2 teaspoons salt, 1 teaspoon pepper, 1 teaspoon garlic powder, 1 teaspoon smoked paprika, 1/2 teaspoon onion powder, and 1/2 teaspoon dried thyme. Sprinkle evenly on both sides. Add a light zesting of lemon over the skin if you like brightness.
- Heat the skillet: Set a large oven-safe skillet (cast iron works best) over medium-high heat. Add 2 tablespoons avocado oil and let it get hot until shimmering.
- Sear skin-side down: Place thighs skin-side down in the pan. Don’t crowd; work in batches if needed. Press lightly with a spatula for the first 30 seconds so the skin makes full contact.
- Render and crisp: Cook without moving for 7–9 minutes, adjusting heat to medium as needed. You want deep golden-brown skin and rendered fat in the pan, not burning.
- Flip and baste (optional): Flip the thighs. Add 1 tablespoon butter and a squeeze of lemon to the pan, then spoon the melted goodness over the meat for extra flavor.
- Oven finish: Transfer the thighs to the prepared rack, skin-side up. Roast 12–18 minutes, depending on size, until the internal temperature reaches 175–190°F. Thighs are forgiving and actually become more tender above 175°F.
- Rest: Let the chicken rest 5–7 minutes. This keeps the juices where they belong.
- Serve: Shower with chopped parsley or chives. Add lemon wedges on the side for a fresh hit right before you eat.
Why This Recipe Works
Chicken thighs have more fat than breasts, which keeps them moist and flavorful without added carbs. The secret to crisp skin is simple: dry the chicken well, season generously, and start it skin-side down in a hot skillet.
Rendering the fat in the pan makes the skin ultra-crunchy and the meat juicy. A quick oven finish cooks them through without drying them out. The spice blend is classic and flexible, so you can customize it without losing that perfect texture.
Shopping List
- Bone-in, skin-on chicken thighs (6 pieces, about 2 to 2.5 pounds)
- Avocado oil or light olive oil (2 tablespoons)
- Salt (preferably kosher)
- Freshly ground black pepper
- Garlic powder
- Smoked paprika (or sweet paprika)
- Onion powder
- Dried thyme or dried oregano
- Lemon (for zest and wedges, optional but great)
- Butter (1 tablespoon, optional for basting)
- Fresh parsley or chives (optional garnish)
- Cooking spray (for the rack, optional)
How to Make It

- Preheat the oven: Set to 425°F (220°C).
Place a wire rack on a sheet pan and lightly spray it to prevent sticking. The rack helps keep the skin crisp all around.
- Pat dry: Blot the chicken thighs very dry with paper towels. This is key.
Damp skin won’t crisp.
- Season: In a small bowl, mix 2 teaspoons salt, 1 teaspoon pepper, 1 teaspoon garlic powder, 1 teaspoon smoked paprika, 1/2 teaspoon onion powder, and 1/2 teaspoon dried thyme. Sprinkle evenly on both sides. Add a light zesting of lemon over the skin if you like brightness.
- Heat the skillet: Set a large oven-safe skillet (cast iron works best) over medium-high heat.
Add 2 tablespoons avocado oil and let it get hot until shimmering.
- Sear skin-side down: Place thighs skin-side down in the pan. Don’t crowd; work in batches if needed. Press lightly with a spatula for the first 30 seconds so the skin makes full contact.
- Render and crisp: Cook without moving for 7–9 minutes, adjusting heat to medium as needed.
You want deep golden-brown skin and rendered fat in the pan, not burning.
- Flip and baste (optional): Flip the thighs. Add 1 tablespoon butter and a squeeze of lemon to the pan, then spoon the melted goodness over the meat for extra flavor.
- Oven finish: Transfer the thighs to the prepared rack, skin-side up. Roast 12–18 minutes, depending on size, until the internal temperature reaches 175–190°F.
Thighs are forgiving and actually become more tender above 175°F.
- Rest: Let the chicken rest 5–7 minutes. This keeps the juices where they belong.
- Serve: Shower with chopped parsley or chives. Add lemon wedges on the side for a fresh hit right before you eat.
Keeping It Fresh
Store leftovers in an airtight container in the fridge for up to 4 days.
To keep the skin crisp when reheating, skip the microwave. Use a 375°F oven or toaster oven for 10–12 minutes, or a hot skillet for a few minutes per side. If freezing, wrap each thigh tightly and store up to 2 months.
Reheat from thawed for the best texture. A quick pass under the broiler at the end brings back the crunch.
Benefits of This Recipe
- Keto-friendly: No breading, no sugar—just seasoned, crispy skin and juicy meat.
- Budget-friendly: Chicken thighs are usually cheaper than breasts yet taste richer.
- High protein, satisfying fat: Keeps you full longer, great for low-carb or busy days.
- Meal prep champ: Stays tasty for several days and reheats well without drying out.
- Flexible flavor base: Works with many spice blends and sides, so you won’t get bored.
Pitfalls to Watch Out For
- Skipping the dry step: If you don’t pat the skin dry, it will steam instead of crisp.
- Too much heat, too soon: A flaming-hot pan can burn the skin before the fat renders. Aim for hot but controlled heat.
- Crowding the pan: Overcrowding traps steam and softens the skin.
Sear in batches if needed.
- Undercooking: Thighs need to reach at least 175°F for peak tenderness. Invest in a meat thermometer.
- Resting on a flat surface: Resting directly on a plate can soften the skin. Use a rack if you can.
Alternatives
- Air fryer method: Pat dry and season as above.
Air fry at 390°F for 18–22 minutes, skin-side up the whole time, until 175–190°F. No flipping required. Skin turns ultra-crisp.
- Oven-only method: Place seasoned thighs on a rack over a sheet pan.
Roast at 425°F for 35–45 minutes until crisp and cooked through. Not as glassy-crisp as the skillet method, but still great.
- Different spice profiles: Try lemon pepper and oregano; chipotle and cumin; curry powder and coriander; or a blend of paprika, cayenne, and mustard powder.
- Boneless, skinless option: Not as crispy, but still tasty. Sear 3–4 minutes per side, then bake 8–10 minutes to 165°F.
Add extra fat (butter or ghee) for richness.
- Saucy finish: After roasting, whisk pan juices with a knob of butter, a splash of lemon, and a pinch of mustard for a quick, keto-friendly pan sauce.
FAQ
Can I use chicken breasts instead of thighs?
You can, but the texture and flavor will be different. Breasts are lean and can dry out more easily. If you use them, lower the finish temperature to 165°F and shorten the oven time.
Consider adding butter or a quick cream pan sauce to keep them juicy and keto-friendly.
How do I know the skin is truly crispy?
Visually, it should be deep golden with tiny bubbles on the surface. When you tap it with tongs, you should hear a light crackle. If it looks pale or feels rubbery, it needs more time skin-side down to render, or a brief blast under the broiler at the end.
What oil is best for high-heat searing?
Use oils with a higher smoke point like avocado oil, refined olive oil, or ghee.
Extra-virgin olive oil can work in a pinch, but watch the heat to avoid smoking and off flavors.
Is the seasoning spicy?
As written, it’s mild and smoky. If you want heat, add 1/4 to 1/2 teaspoon cayenne or red pepper flakes. If serving kids or spice-sensitive guests, keep it as is or use sweet paprika.
What sides go well while keeping it keto?
Great options include roasted broccoli, cauliflower mash, sautéed green beans, a simple arugula salad with olive oil and lemon, or zucchini ribbons tossed with garlic and parmesan.
Keep sides salty and bright to balance the rich chicken.
Can I cook these straight on the pan without a rack?
Yes, but the underside may soften as it rests. If you skip the rack, let the thighs rest briefly in the skillet off heat, then transfer them to a plate lined with a paper towel to wick away steam, and serve soon after.
How can I reduce the sodium?
Cut the salt by half and boost flavor with extra lemon zest, fresh herbs, and smoked paprika. You can also finish with flaky salt at the table so each person controls their intake.
What internal temperature should I aim for with thighs?
For dark meat, 175–190°F is ideal.
Collagen breaks down at higher temps, making the meat tender and juicy. Thighs are forgiving, so don’t be afraid to cook past 165°F.
Can I marinate the thighs first?
You can, but avoid wet marinades right before searing because moisture prevents crisping. If you marinate, pat them very dry and re-season lightly with salt and spices before cooking.
How do I scale this recipe for a crowd?
Use two skillets or sear in batches, then finish all the thighs together on two racks in the oven.
Rotate the pans halfway through roasting for even browning. Keep the spice ratios the same and season generously.
In Conclusion
These crispy keto chicken thighs are a reliable, no-fuss dinner with big payoff. With a few smart steps—drying, searing, and finishing in the oven—you get crunchy skin and tender, flavorful meat every time.
Keep the seasoning simple, serve with bright sides, and enjoy a meal that fits your goals without sacrificing taste. Make a double batch for easy lunches, and you’ll be set for the week.